Sunday 27 February 2022

Mixed media faux cloisonné gerbera for Uniko's 10th birthday!

Dusted off the blog and hopefully I can get back into posting more often again, rather than just on Facebook and Instagram. Doing a blog post is a great reminder of how I made some of my cards and so useful to look back on in the future! 

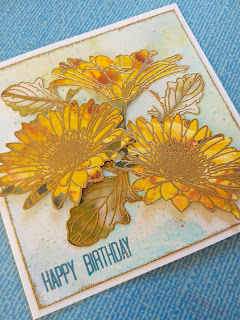
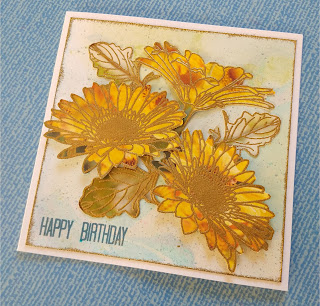
Today I have made a card to celebrate Uniko's 10th birthday. I wanted to try out one of the faux cloisonné techniques I recently came across and knew I wanted to experiment with the fabulous gerbera set. 

Pure Florals: Gerbera (Uniko Studio)

For this card, I used the magazine technique. I found a large photo of some yellow Echinacea in a gardening magazine, which I cut out and adhered to a piece of 200gsm white cardstock. I stamped both flower images (one of them twice) and both sizes of the leaf stamp in embossing ink, carefully choosing which parts of the photo to use, embossed in gold and fussy cut. I did find that using glossy magazine paper made the embossing slightly brittle and very easy to chip off so I'm making a note to be very careful with it, especially when fussy cutting the images. 

For my background I used something I previously made in a Tracy Evans workshop by using alcohol inks in plain water and dipping lightweight cardstock into it. This piece was primarily blues, greens and yellows though I can't remember now the colours of inks that I used. I added interest with some blue Distress Oxide splatters, stamped the sentiment in blue and used my embossing ink pad and gold EP to add a border to the edge of the card. I arranged my flowers and leaves on the card gluing the leaves flat. The partially opened flower has just been raised in the middle with foam pads and glued at the edges, whilst the two big blooms were stuck on with foam pads. 

I love how this turned out but next time I want to try using my IndigoBlu Luscious pigment powders to paint the flowers as I think this will give a more realistic cloisonné effect.

Pure Florals: Gerbera (Uniko Studio)

Supplies Used:
Stamps: Pure Florals: Gerbera, Simply Said Birthday (Uniko Studio)
Ink Pads: Stormy Sky (Distress Oxides), Cornflower Blue (Wendy Vecchi Archival - Ranger)
Embossing: WOW Embossing Pad, Gold embossing powder
Snippets: White cardstock (200gsm), Magazine paper, Alcohol inks

I would like to enter this card into the following challenge:


Many congratulations Bev, on reaching such a milestone birthday. It's no mean feat for a small company especially with all the crazy events of the past few years!

Thanks for visiting!
Stef

Monday 13 April 2020

AALL & Create Mini Book

This is a little album that I made following a facebook live (or three!) by the wonderfully talented Tracy Evans using stamps by AALL & Create, some by Tracy. I love the way it has turned out and will definitely be making more mini books as I just adore them!

The front cover
The book started as an A4 sheet of thin card (200gsm). The first layer was made by dripping alcohol inks into a bowl of water, then immersing the card in it and leaving it to thoroughly dry. The lovely thing about this technique is that you get colour on both sides, just lighter on the back. I did a whole pile while I was at it so now have a lovely stash of backgrounds to use!

Back cover
The card was then folded and cut to make a book 7.5 x 10.5cm. Two separate pieces of thicker card were used to make book covers. Layers of blue/green paint were applied to the covers and areas removed using a stencil with a baby wipe. Touches of purple were added using a stencil dabbed in paint, misted and used as a stamp. Extra stamping was added using the same blue and green paints. The main images were stamped in black and then decoupaged on book text. Sentiments were added using smooshed scraps of card. Doodles and splatters with white pens were added for even more texture!

Pages 1 & 2

Pages 1 and 2 are my least favourite, but they were created using similar techniques to the front and back covers with extra touches of purple introduced with an old credit card. I wish now I'd kept the black on black and the blue on blue!

Pages 3 & 4

This are my favourite pages, it just works and I love the slightly paler colours! The image was stamped onto card smooshed with ink pads and misted a lot! It's nice to also see the original alcohol inked backgrounds on these pages.


These pages were created by adding Distress Oxides blended through a stencil and continues the circle theme to the book. Texture was added with background stamping and this time the sentiments were stamped onto book text.


Left over stamped elements were added to some of the pages. The book was finished by adding lines of stitching to the open pages and sandwiching pieces of ribbon before adhering the front and back covers.

Supplies used:
Ranger Alcohol Inks: Dandelion, Denim, Silver (mixative)
Fresco Finish Acrylics: Amethyst, Venice Blue, Zucchini
Stencils: Bubbles (IndigoBlu), Mini Tiny Circles (TCW)
Distress Inks & Oxides: Faded Jeans, Peeled Paint, Seedless Preserves
AALL & Create Stamps: #150 Create It Grunge, #162 Bouquet Border, #239 Teasel
Inks and Pens: Onyx Black (Versafine), White pen for splatters(Posca), White pen for detailing (Sakura Gelly Roll)
Caran D'Ache Crayons: Leaf Green, Royal Blue
Snippets: 200gsm thin white card, Greyboard, Book text, Ribbon 

If nothing else this serves as a reminder for making the next one!
Stef x

Aurora on a Monoprinted Background

So where has the last two years gone! There have been huge changes for all our family. We have moved away from Lancashire and back to Norfolk, close to the coast. My mum is now living with us and I have a new job working in a secondary school fifteen minutes away. Instead of volunteering with Guides, I am now working with Rainbows - very different! Our children too have all had big lifestyle changes including making us grandparents for the first time!

Now that my craft space and other things are reasonably sorted, I can finally give myself some creative time again! And in these strange times we are currently going through with Coronavirus sweeping across the world and taking many lives with it, it's nice to find some sanctuary away from the news and making the most of time spent at home. So many well-known crafters are giving up their time to keep us entertained and educated through facebook live videos, there is no shortage of inspiration and I thank everyone who is finding some way of doing their bit to keep our creative community going!

I have decided to resurrect my blog as a reference point for my creative makes and have vowed to post more on other social media platforms too! So now that her birthday has past I can share a card that I made in the last week for Kes.


I created the background on my Gel Press using Brushos. I scrunched up some paper and used it with Distress Inks to add some texture especially around the edges. The main image and the blossoms are stamped in black and coloured with inks; the ivy and the thistles are stamped in grey. I added a masked moon with some sparkle around it as well as on the fairy wings and falling from the flowers (though it doesn't show up well in the photo).

Supplies Used:
Brushos: Lime Green, Turquoise, Violet & Yellow
Distress Inkpads: Dusty Concord & Peeled Paint
Lavinia Stamps: Aurora, Small Trailing Ivy, Star Blossom & Thistles
Versafine Inkpads: Onyx Black & Smokey Gray
Snippets: Sakura Gelly Roll pen (Clear Star)

Stay safe and well
Stef x

Monday 26 February 2018

Mixed Media Valentine

I was lucky enough to receive a subscription to Craft Stamper for Christmas and a project in the March edition really caught my eye when looking for some Valentine inspiration. I haven't copied Tracy's project but have been inspired by the design and by her sketch to make my card.


I made a masterboard by brayering 'Blue Oyster' acrylic paint lightly in patches onto a piece of 300gsm card and then with a dry brush/baby wipe applied patches of 'Mermaid', 'Jade', 'Lime Marmalade' paints and white gesso until I was happy with my background. I then dry brushed it with the Interference paint which gave it a gorgeous opalescent sheen in places. I stamped the background script with Distress ink.


I don't have any mdf shapes so I made my own heart embellishment by die-cutting a heart five times from strong grey card and sandwiched them together. I applied texture paste on top and left it to dry before adding patches of 'Mermaid' and 'Lime Marmalade' paint and then overpainting with 'Park Lane'.

I dry brushed two doilies, one for the outside and one for the inside with 'Mermaid', 'Lime Marmalade' and 'Park Lane' paint. The sentiment was printed using my Dymo Letratag gadget with paint smeared over the top.

I cut a piece of the masterboard to fit my card blank using a dark blue mat. The doily and the sentiment were stuck to the card colouring around the edges with a blue pencil to embed them into the card. Scraps of ribbon, lace and cotton thread were stuck to the doily before placing the heart on top. I finished by making some marks with white gesso and splattering blue paint and white gesso to tie everything together. The piece of the doily that was left over from the front of the card was put on the back for interest and the remaining doily was stuck inside with the other part of the sentiment.


Supplies Used:
Acrylic Paints: Blue Oyster, Jade & Mermaid (PaperArtsy Fresco Chalk); Lime Marmalade & Park Lane (IndigoBlu), Interference Green (DecoArt Fluid)
Stamps: Background Script (Lavinia Stamps)
Inks: Stormy Sky (TH Distress)
Dies: Classic Hearts (Spellbinders)
Snippets: 300gsm card, Thick grey card, White doilies, White gesso, Pearlescent embossing paste, Blue pencil (Derwent Cumberland), Ribbon, Lace, Cotton thread
Tracy's original
I would like to enter this project into the following challenges:

I seemed to have everything everywhere while making this project but I really enjoyed doing it! Thanks for visiting.

Stef x

Friday 2 February 2018

New Year, New Challenges, New Job?

So I've been away for a while focusing on family and personal stuff but really want to get back to sharing my crafting and joining in with a few challenges along the way. My thoughts led me to join in with the Mission Inspiration challenge for January on facebook. So two firsts! My first ever art journal page and my first ever entry into the challenge. Each month Mike Deakin sets a series of prompts together with some colour swatches and inspirational words and that takes away the fear of starting with a blank page! I followed the prompts exactly and am reasonably pleased with the results. I just need to spend far less time faffing and trying to decide what to do and just go for it! I hope that this is the first of many art journal pages to come!


Supplies Used:
Paints: Apricot Blush & Townhouse Teal (IndigoBlu Acrylic)
Stencils: Bubbles & Faded Dots (IndigoBlu)
Images: Snowdrops (Carol Ann Clarke for Craftsuprint), Photo from my garden
Music Text: Auld Lang Syne
Stamp: Ivy leaf (Toodles & Binks - free with Craft Stamper Sept 2011)
Ink Pad: Lettuce (Adirondack)
Page Title Font: Annie BTN
Snippets: Stripy patterned paper, White gesso, Black Staedtler triplus fineliner, Derwent Cumberland colouring pencils


Can't wait to see what Mike's got lined up for tomorrow when the February challenge starts!

Thanks for visiting
Stef x

Thursday 8 September 2016

CC&S Sketch Challenge 190: I too must say goodbye ...

I'm sad to say that this will be my last post as a DT member of CAS Colours and Sketches. To cut a long story short and keep this post about crafting, my mum has not been well recently and had a short stay in hospital. She has been staying with us since she came out as she lives on her own but it is going to take her some weeks/months to recover. Having taken on a more demanding role at work this term, something has to give so that I have more time for my mum and for now that means that my crafting time will have to be restricted.


So to finish with a card featuring a technique (which, if anything, is what I'll be remembered for at CC&S) and some flowers and butterflies. Karen is our hostess this month and this week she has given us a sketch with lots of possibilities! When I saw it I immediately thought of making a cutaway card which I hope shows up in the photo. To save time, I used part of a masterboard on the inside of the card that I made some time ago having followed a video on the fabulous Eileen Godwin's YouTube channel HERE. I cut away the curve from the front of the card and then trimmed the edge with die-cut and punched butterflies to match the colours used on the masterboard. The sentiment is printed directly onto the card and, after I had photographed the card for my post, I added some pearls to the butterfly bodies.


I think I can just about get away with calling this a CAS card because over half the front of it is still white even though the rest of it is quite busy! I'm going to give this to my friend Angela at work who is lucky enough to be taking early retirement in a couple of weeks' time.

Supplies Used:
Stamps:  Beautiful Blooms 1 (Uniko Studio) 
Ink Pads: Milled Lavender, Tumbled Glass & Worn Lipstick (TH Distress) - I think, though not sure exactly which colours I used now
Stencil: Small butterfly (free with a magazine)
Die & Punch: Small butterfly (XCut)
Sentiment Font: Rage Italic
Snippets: White gesso, Small bubbles stamp, White and silver gel pens

I will carry on crafting, card-making and blogging but maybe with not as much regularity in the next few months. I love it all too much not too and it has definitely become my sanctuary, somewhere where I can lose myself, listen to music and be creative.

Thank you all so much for being part of my CC&S journey and for your continued support of our CAS challenge. I will always remember it for being my first ever DT and I will continue to follow what's happening and join in when I can. The rest of the ladies on the DT are a brilliant bunch of crafters to work with and I am thankful to them for their friendship and support and for helping me to extend my creative boundaries over the last couple of years!

Stef x

Thursday 4 August 2016

CC&S Challenge 185 Colours: Shades Of Blue

It's Liz's turn to host at CAS Colours and Sketches this week (I hadn't realised that it was her debut!) and she has chosen a trio of blues for us to work with including one of the new SU colours. I love all shades of blue so absolutely no problem coming up with ideas this week!


I also wanted to try out the technique of pattern stamping as seen in one of Jennifer McGuire's videos HERE recently. I didn't have any tiny stamps that were suitable for colouring in so I just had to go and buy the same cute little set that Jennifer uses - what a shame! I do have some small stamps, mostly from Card-io but they are almost all silhouette stamps which I couldn't have used to achieve the same effect. I have only partially stamped the cardstock to keep it CAS but will definitely try some all over designs too. I have used three shades of Promarkers to colour in with. I included the aperture with the sentiment adhered to the inside of the card but by design, thanks to Jennifer, and not to cover up any mistakes!


I enjoyed playing so much that I made three quite similar cards in one afternoon, unusual for me, using different embossing powders and colour combinations (will show the others after they have been given to their intended recipients!)


Supplies Used:
Stamp Set: Just For You (Lia Griffith for Hero Arts)
Marker Pens: Denim Blue, Sky Blue & Indigo Blue (Promarkers)
Ink Pad: Smokey Gray (VersaFine)
Snippets: Clear EP, Computer-generated sentiment

Do visit some of the other DT blogs if you have time, especially Liz. I remember how nerve-racking my first challenge was! I'm taking a short break from CC&S for the next two weeks for a family holiday but I'll be back before you know it!

Have fun!
Stef x